Page 2 of 3 FirstFirst 123 LastLast
Results 11 to 20 of 623

Thread: Building A looper Beast

Hybrid View

  1. #1
    Team Member R Austin's Avatar
    Join Date
    Aug 2005
    Location
    ludington Michigan
    Posts
    250
    Post Thanks / Like

    Default

    The piston line up. When Mercury came out with the Direct Charge it did not have a boost port. The piston did not have a hole. Then the boost port was created and the hole was added. Later they decided to add the eyebrow clip on the piston crown. So, on the left you have a service piston with the dome clip for non boost ported. The test piston I cut down which is the full blown piston with boost hole and eyebrow clip, which is the piston supplied for service today. Then the early version of the boost port piston without eyebrow clip. Next is the piston supplied by Wiseco as requested, my re-machined Wiseco piston and a Quincy Looper 60 inch piston.

    The following are pictures of the machine work on the piston to create the loop piston. The changes that Wiseco made were, eliminate the boost hole which would have allowed cross flow between the transfers and the exhaust ports, elimination of the dome eyebrow cut which would have changed transfer timing, the piston is .100 longer on the skirt length below wrist pin for better exhaust port coverage a top dead center which would have been .063 and now .162. The notches for wrist pin keeper removed and the chamfering of the pin hole was eliminated. The wrist pin diameter is large and spans the web between the upper transfer ports and the web between the exhaust ports. Elimination of those operations keeps that width at the wrist pin diameter and to stop the cross contamination thru the wrist pin I will press a .75 long aluminum plug into the mid point of the wrist pin.

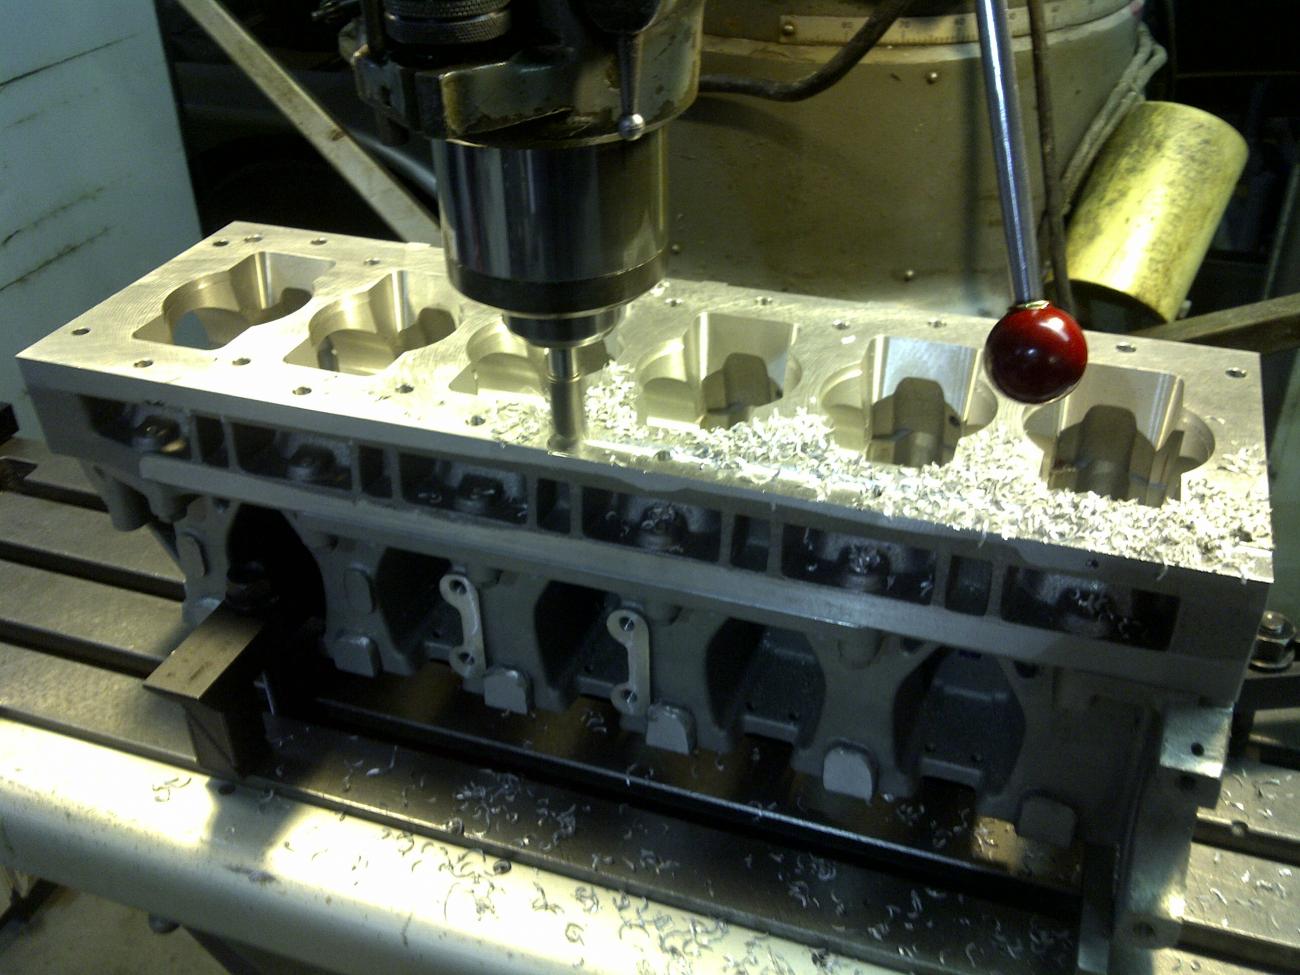
    With the now known final piston height, I installed a .062 walled sleeve into number 5 hole and bored to size. Set up the block with crank installed and checked the deck to piston to verify port positions and the the final deck height. I had planned for a total remaining removable of .250 from the three faces, case to block, block to case and the head surface. The number came to .260. Removed .085 from case face, .080 from block to case face and .080 from head surface, leaving .015 on head to clean up after sleeve placement and final porting. Will have .015 piston to head running clearance. A guessed at number. The Quincys ran piston flush with the block and the head gasket gave .010 running clearance. Pistons ran so close to the head that there would be a distinct combustion color change on the top of the piston.

    The reed blocks are on the crank only as holding fixtures, they split easily, bearings do not need to be loaded and they snap tight into the half case.


    Name:  IMG-20130621-01443.jpg
Views: 1290
Size:  149.0 KBName:  IMG-20130505-01300.jpg
Views: 1263
Size:  163.1 KBName:  IMG-20130505-01301.jpg
Views: 1298
Size:  119.6 KBName:  IMG-20130526-01368.jpg
Views: 1218
Size:  131.1 KBName:  IMG-20130526-01367.jpg
Views: 1196
Size:  120.9 KBName:  IMG-20130526-01369.jpg
Views: 1211
Size:  137.5 KBName:  IMG-20130608-01387.jpg
Views: 1223
Size:  216.3 KBName:  IMG-20130608-01393.jpg
Views: 1192
Size:  285.6 KBName:  IMG-20130608-01391.jpg
Views: 1233
Size:  296.3 KBName:  IMG-20130609-01394.jpg
Views: 1205
Size:  146.9 KB

  2. #2
    Team Member R Austin's Avatar
    Join Date
    Aug 2005
    Location
    ludington Michigan
    Posts
    250
    Post Thanks / Like

    Default

    Work continues with small items that require addressing before assembly. Following pictures are reed adapter plate dressing to remove edges for better fit to the manifold cover. The stater mount pad on the front cover had to be re-milled after welding to return to a flat and true state. Only required a .010 cut to return to flat. Had to also confirm that the starter bracket cleared the welding for the reed modification. Completed machining of the starter support bracket.

    Cut the sleeves to length and turned a .005 under sized pilot .187 long. Makes the quick squaring for insertion into the heated block much easier. Pilot is excess material that will be cut off after installation.

    Making the final block head surface cut prior to boring for the sleeve fit. Will run a .0025 to .0035 under size hole for shrink fit.


    Name:  IMG-20130627-01447.jpg
Views: 1143
Size:  151.4 KBName:  IMG-20130627-01448.jpg
Views: 1141
Size:  146.4 KBName:  IMG-20130627-01449.jpg
Views: 1112
Size:  174.9 KBName:  IMG-20130701-01463.jpg
Views: 1163
Size:  139.5 KBName:  IMG-20130604-01384.jpg
Views: 1134
Size:  143.8 KBName:  IMG-20130604-01385.jpg
Views: 1108
Size:  113.2 KBName:  IMG-20130605-01386.jpg
Views: 1093
Size:  148.3 KBName:  IMG-20130630-01458.jpg
Views: 1144
Size:  115.5 KBName:  IMG-20130701-01462.jpg
Views: 1090
Size:  155.6 KBName:  IMG-20130620-01441.jpg
Views: 1097
Size:  147.0 KB

  3. #3
    Team Member Looperfan's Avatar
    Join Date
    Sep 2012
    Location
    holland michigan
    Posts
    6
    Post Thanks / Like

    Default

    Looks really sharp

  4. #4
    Team Member
    Join Date
    Sep 2005
    Posts
    63
    Post Thanks / Like

    Default

    Thanks for the update on the carb preparation. Wish I could go over to see it on the 18th but plan on being at the World Championships in Lake Alfred FL that weekend but I'm sure I'll get to see it sooner or later.

  5. #5
    Team Member Looperfan's Avatar
    Join Date
    Sep 2012
    Location
    holland michigan
    Posts
    6
    Post Thanks / Like

    Default

    Lol .... It will surely throw a rooster tail

  6. #6
    Team Member Looperfan's Avatar
    Join Date
    Sep 2012
    Location
    holland michigan
    Posts
    6
    Post Thanks / Like

    Default

    I think a action shot is due

  7. #7
    Team Member Looperfan's Avatar
    Join Date
    Sep 2012
    Location
    holland michigan
    Posts
    6
    Post Thanks / Like

    Default

    The perfect smile of a good start

  8. #8
    Team Member
    Join Date
    Jun 2005
    Location
    Eastern PA
    Posts
    661
    Post Thanks / Like

    Default

    I noticed something that could cause you problems: it appears that you stacked the switch boxes one atop the other. Though a neat installation, the top box needs to contact a slab of 'cool' aluminum to effect a heat sink function.

    Jeff
    "We live at the bottom of an ocean of air." - General Marvage Slatington

  9. #9
    Team Member Droll-l6's Avatar
    Join Date
    Jul 2005
    Location
    Norway
    Posts
    37
    Post Thanks / Like

    Default

    Quote Originally Posted by Fastjeff57 View Post
    it appears that you stacked the switch boxes one atop the other. Though a neat installation
    Probably not a big problem as they are stacked that way on most if not all V6 engines that uses the same switch boxes ...


    Arne Kjetil
    My engines :
    Mercury TII, next project
    Johnson V4m-10s 90 hp 1964,from the prosess.
    Mercury 1400 1972 ,Rebuilding a Tower

  10. #10
    Team Member
    Join Date
    Jun 2005
    Location
    Eastern PA
    Posts
    661
    Post Thanks / Like

    Default

    Okay. Didn't want that to be a problem with this jewel.

    Jeff
    "We live at the bottom of an ocean of air." - General Marvage Slatington

Thread Information

Users Browsing this Thread

There are currently 9 users browsing this thread. (0 members and 9 guests)

Similar Threads

  1. Legendary Dub Parker's B Looper found!
    By Original Looper 1 in forum Outboard Racing History
    Replies: 6
    Last Post: 07-25-2022, 06:16 PM
  2. Quincy Looper Pictures and Collections
    By Original Looper 1 in forum Outboard Racing History
    Replies: 71
    Last Post: 01-21-2008, 04:26 PM
  3. Waldman F 44 Looper has been found!
    By Original Looper 1 in forum Outboard Racing History
    Replies: 26
    Last Post: 06-18-2007, 09:55 AM
  4. Quincy's 90 ci King Looper Beast
    By Original Looper 1 in forum Outboard Racing History
    Replies: 1
    Last Post: 04-06-2007, 07:08 AM

Bookmarks

Posting Permissions

  • You may not post new threads
  • You may not post replies
  • You may not post attachments
  • You may not edit your posts
  •